

Yes, the moment you have all been waiting for! Here is the second square of the knit traveling afghan!
What am I talking about? – you say. Well, this is a project sponsored by Lion Brand where 49 different designers from all over the world work together to make two full afghans – one crochet and one knitted. Each designer will make a 10′ x 10′ square to add to the afghan before sending it off to the next designer in a different place in the world. I am second in the knit afghan and the first square was sent to me by Alexi of Two Of Wands all the way from New York City to my tiny village in Bulgaria. If you want more information and to have a closer look at the schedules, you can get more details HERE (Got questions? Check out the FAQ section at the bottom of the landing page).
Before I tell you about my square, let me just clarify that each designers has a 2 week span to publish their square. This is because the afghan is literally going around the world and it would be impossible to predict when each person will get it. So please, try to give the next designers time to post when they are ready. I promise, they WILL share their pattern with you!
Visit my fellow makers’ blogs and get all of the patterns! I will be updating this list as the year goes by so that you can find them all in one place!
- New York City, USA – Alexi of Two of Wands
- Veliko Tarnovo, Bulgaria – Me! – Continue reading
- Dublin, Ireland – Katie of The Queen Stitch
- Nova Scotia, Canada – Kelly Brooks of Knitbrooks
- Alberta, Canada – Stephanie Lau of All About Ami
- Alberta, Canada – Chantal Miyagishima of Knitatude

You can purchase an ad-free, printable PDF of the pattern HERE.
If you’d like to buy the kit directly from Lion Brand you can do so HERE.
#MyLifeInYarn
Now, let me tell you about my square!
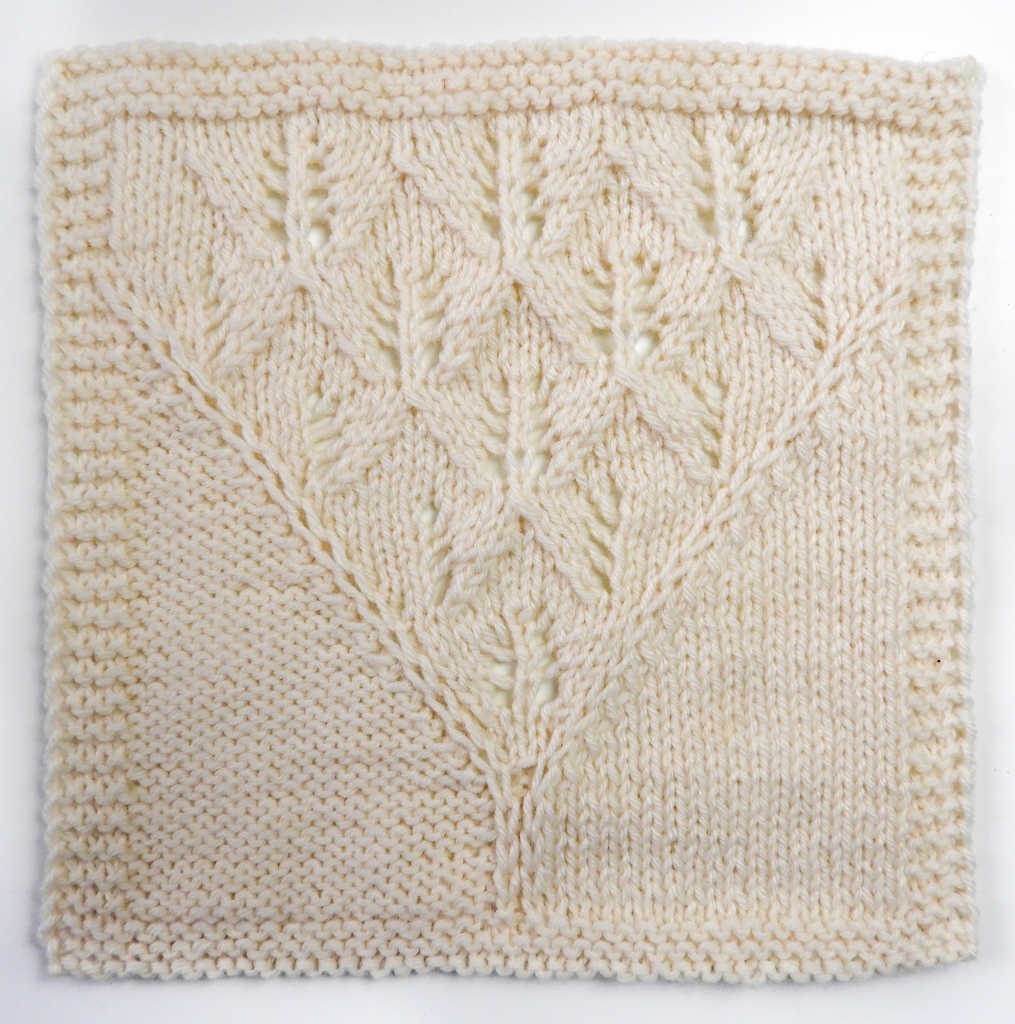
I see my square as a bit of a family portrait. My husband and my baby girl are by far the biggest targets of my crafting obsession so I wanted to represent them in my square. We’re also a bit of a mish mash family. My husband is a white, tall, red-haired, sports loving man from England. I am a brown, dark haired, crafts loving woman from Mexico. But we’re both perfectly average – may I dare say, a bit like a stockinette stitch? Simple, yet wonderful in its own right.

And along comes Magnolia, just brightening our lives and making everything more beautiful. She was actually born in Bulgaria, the land of roses and so far is showing only our best qualities. She, you might say, is like the lace to our stockinette.
Anyway, here’s the square. Each section representing a member of my family.

If you do end up making the square, make sure to tag me on social media (@NomadStitches) or Ravelry so that I can see it, and don’t forget to use the hashtags #travelingafghans #mylifeinyarn #travelingknitafghan #travelingcrochetafghan #travelingafghannomadstitches
Now let’s talk knitting. The square is made bottom up. It has a garter stitch border and the inside is divided by three sections: stockinette, reverse stockinette and lace. You will start by working the border and then the stockinette sections. Afterwards, you will decrease on one side of the stockinette sections and increase in the middle to make way for the lace section. When you start the lace section you can choose to follow the chart and the charted instructions or use the written directions provided.
The Essential Information
Materials
- YARN: Worsted yarn – Sample is used 31g of Wool-Ease by Lion Brand Yarn (aprox 72 yards).
- NEEDLES: 5 mm or size needed to meet gauge.
- NOTIONS: tapestry needle and 4 stitch markers.
- GAUGE:18 sts x 24 rows of stockinette st = 4’ x 4’
Sizes + measurements
The square is 10’ x 10’ (25.4 cm x 25.4 cm).
Abbreviations (US)
- CO: cast on
- K: knit
- K2tog: knit two together
- M1R / M1L: Make one Right/Left
- Mkr(s): marker(s)
- P: purl
- PM: place marker
- RS: Right side
- Sm: slip marker
- Ssk: slip slip knit
- Ssp: Slip slip purl
- Sk2po: Slip, knit two together, pass over
- Skpo: Slip, knit, pass over
- sl: slip stitch
- st: stitch
- WR: Wrong side
- Wyf: with yarn in front
- YO: Yarn over
Important Techniques
- M1R: pick up the bar between the last stitch you knit and the next one, bringing the needle from the back to the front. Then knit into the front of this stitch.
- M1L: Pick up the bar between the stitch you knit and the next one, bringing the needle from front to back. Then knit into the back of the stitch.
- Ssp: Slip 2 knit-wise, slide back to left needle, purl two together through the back loop.
- Ssk: Slip 2 knit-wise, insert left needle into these two stitches and knit them together.
- Sk2po: Slip one knit-wise, knit next two stitches together, pass slipped stitch over the stitch you just knit.
- Skpo: Slip one knit-wise, knit next stitch, pass slipped stitch over the stitch you just knit.
I know what you’re thinking: “That’s a lot of abbreviations and a lot of important techniques!”. But don’t worry, here you can find clear video instructions for each of the stitches in this square. These squares are such a great opportunity to learn new things. It’s not like you’re making a whole jumper or shawl! I mean, seriously, 45 stitches per row! See it as a challenge and go do a happy dance once you’ve mastered these techniques!
The Pattern
It appears that I let excitement get the better of me and the first version had a few errors that I let slip by. Sorry about that. I really hope it didn’t cause you too much trouble. They should all be solved now, but please contact me if you are unsure about something. Thank you for your understanding and happy knitting! (Last pattern edit: Jan 28, 2020)
CO 45
ROW 1 – 4: Sl1 wyf, k to end, turn.
ROW 5 (RS): Sl1 wyf, k3, PM, k17, PM, sl1, p1, sl1 (these 2 sts will be slipped purlwise with yarn in the back from here on), PM, k17, PM, k4, turn.
ROW 6 (WS): Sl1 wyf, k to mkr, sm, k to mkr, sm, p1, k1, p1, sm, p to mkr, sm, k to end, turn.
ROW 7: Sl1 wyf, k to mkr, sm, k to mkr, sm, sl1, p1, sl1, sm, p to mkr, sm, k to end, turn.
ROW 8: Sl1 wyf, k to mkr, sm, k to mkr, sm, p1, k1, p1, sm, p to mkr, sm, k to end, turn.
ROWS 9 – 14: Repeat Rows 7 and 8.
ROW 15: Sl1 wyf, k to mkr, sm, k to 2 before mkr, skpo, sm, sl1, M1L, k1, M1R, sl1, sm, ssp, p to mkr, k to end, turn.
ROW 16: Sl1 wyf, k to mkr, sm, k to mkr, sm, p to mkr, sm, p to mkr, sm, k to end, turn.
You can now continue and follow the written instructions or skip ahead to the charted instructions.
Written instructions
ROW 17: Sl1 wyf, k to mkr, sm, k to 2 before mkr, skpo, sm, sl1, M1L, k3, M1R, sl1, sm, ssp, p to mkr, sm, k to end, turn.
ROW 18: Sl1 wyf, k to mkr, sm, k to mkr, sm, p to mkr, sm, p to mkr, sm, k to end, turn.
ROW 19: Sl1 wyf, k to mkr, sm, k to 2 before mkr, skpo, sm, sl1, M1L, k2tog, YO, k1, YO, ssk, M1R, sl1, sm, ssp, p to mkr, sm, k to end, turn.
ROW 20: Rep Row 18.
ROW 21: Sl1 wyf, k to mkr, sm, k to 2 before mkr, skpo, sm, sl1, M1L, k2tog, k1, YO, k1, YO, k1, ssk, M1R, sl1, sm, ssp, p to mkr, sm, k to end, turn.
ROW 22: Rep Row 18.
ROW 23: Sl1 wyf, k to mkr, sm, k to 2 before mkr, skpo, sm, sl1, M1L, k2tog, k2, YO, k1, YO, k2, ssk, M1R, sl1, sm, ssp, p to mkr, sm, k to end, turn.
ROW 24: Rep Row 18.
ROW 25: Sl1 wyf, k to mkr, sm, k to 2 before mkr, skpo, sm, sl1, M1L, k2tog, k3, YO, k1, YO, k3, ssk, M1R, sl1, sm, ssp, p to mkr, sm, k to end, turn.
ROW 26: Rep Row 18.
ROW 27: Sl1 wyf, k to mkr, sm, k to 2 before mkr, skpo, sm, sl1, M1L, k2, YO, ssk, k5, k2tog, YO, k2, M1R, sl1, sm, ssp, p to mkr, sm, k to end, turn.
ROW 28: Rep Row 18.
ROW 29: Sl1 wyf, k to mkr, sm, k to 2 before mkr, skpo, sm, sl1, M1L, k3, YO, k1, ssk, k3, k2tog, k1, YO, k3, M1R, sl1, sm, ssp, p to mkr, sm, k to end, turn.
ROW 30: Rep Row 18.
ROW 31: Sl1 wyf, k to mkr, sm, k to 2 before mkr, skpo, sm, sl1, M1L, k4, YO, k2, ssk, k1, k2tog, k2, YO, k4, M1R, sl1, sm, ssp, p to mkr, sm, k to end, turn.
ROW 32: Rep Row 18.
ROW 33: Sl1 wyf, k to mkr, sm, k to 2 before mkr, skpo, sm, sl1, M1L, k5, YO, k3, sk2po, k3, YO, k5, M1R, sl1, sm, ssp, p to mkr, sm, k to end, turn.
ROW 34: Rep Row 18.
ROW 35: Sl1 wyf, k to mkr, sm, k to 2 before mkr, skpo, sm, sl1, M1L, k1, (YO, ssk, k5, k2tog, YO, k1) twice, M1R, sl1, sm, ssp, p to mkr, sm, k to end, turn.
ROW 36: Rep Row 18.
ROW 37: Sl1 wyf, k to mkr, sm, k to 2 before mkr, skpo, sm, sl1, M1L, k2, (YO, k1, ssk, k3, k2tog, k1, YO, k1) twice, k1, M1R, sl1, sm, ssp, p to mkr, sm, k to end, turn.
ROW 38: Rep Row 18.
ROW 39: Sl1 wyf, k to mkr, sm, k to 2 before mkr, skpo, sm, sl1, M1L, k3, (YO, k2, ssk, k1, k2tog, k2, YO, k1) twice, k2, M1R, sl1, sm, ssp, p to mkr, sm, k to end, turn.
ROW 40: Rep Row 18.
ROW 41: Sl1 wyf, k to mkr, sm, k to 2 before mkr, skpo, sm, sl1, M1L, k4, (YO, k3, sk2po, k3, YO, k1) twice, k3, M1R, sl1, sm, ssp, p to mkr, sm, k to end, turn.
ROW 42: Rep Row 18.
ROW 43: Sl1 wyf, k to mkr, sm, k to 2 before mkr, skpo, sm, sl1, M1L, YO, ssk, k5, k2tog, YO, (k1, YO, ssk, k5, k2tog, YO) twice, M1R, sl1, sm, ssp, p to mkr, sm, k to end, turn.
ROW 44: Rep Row 18.
ROW 45: Sl1 wyf, k to mkr, sm, k to 2 before mkr, skpo, sm, sl1, M1L, k1, (YO, k1, ssk, k3, k2tog, k1, YO, k1) 3 times, M1R, sl1, sm, ssp, p to mkr, sm, k to end, turn.
ROW 46: Rep Row 18.
You should have 4 sts of border at each side, 1 st in between the 1st and 2nd mkr and the 3rd and 4th mrk; and 35 sts in between the 2nd and 3rd mkr.
ROW 47: Sl1 wyf, k2, sl 1 to remove mkr and return st to left needle, k2tog, remove mkr, sl1, M1L, k2, (YO, k2, ssk, k1, k2tog, k2, YO, k1) 3 times, k1, M1R, sl1, remove mkr, sl1 to remove mkr, and return st to left needle, ssk, k to end, turn.
ROW 48: Sl1 wyf, k3, p37, k to end, turn.
ROW 49: Sl1 wyf, k2, k2tog, M1L, k3, (YO, k3, sk2po, k3, YO, k1) 3 times, k2, M1R, ssk, k to end, turn.
ROW 50: Sl1 wyf, k3, PM, p37, PM, k to end, turn.
ROW 51: Sl1 wyf, k to mkr, sm, k6, (k2tog, YO, k1, YO, ssk, k5) 3 times, k1, sm, k to end, turn.
ROW 52: Sl1 wyf, k to mkr, sm, p to mkr, sm, k to end, turn.
ROW 53: Sl1 wyf, k to mkr, sm, k5, (k2tog, k1, YO, k1, YO, k1, ssk, k3) 3 times, k2, sm, k to end, turn.
ROW 54: Rep Row 52.
ROW 55: Sl1 wyf, k to mkr, sm, k4, (k2tog, k2, YO, k1, YO, k2, ssk, k1) 3 times, k3, sm, k to end, turn.
ROW 56: Rep Row 52.
ROW 57:
Sl1 wyf, k to mkr, sm, k3, k2tog, k3, YO, k1, YO, k3, (sk2po, k3, YO, k1, YO, k3) 2 times, ssk, k3, sm, k to end, turn.
ROW 58: Rep Row 52 – remove mkrs.
ROW 59 – 63: Sl1 wyf, knit to end, turn.
Bind off on WS.
Charted Instructions
Follow the chart provided at the bottom where it says <CHART>. The rows on the chart match the rows on these instructions.
ROW 17: Sl1 wyf, k to mkr, sm, k to 2 before mkr, skpo, sm, sl1, M1L, <CHART>, M1R, sl1, sm, ssp, p to mkr, k to end, turn.
ROW 18: Sl1 wyf, k to mkr, sm, k to mkr, sm, p2, <CHART>, p2, sm, p to mkr, k to end, turn.
ROW 19 – 46: Repeat Rows 17 and 18.
You should have 4 sts of border at each side, 1 st in between the 1st and 2nd mkr and the 3rd and 4th mrk; and 35 sts in between the 2nd and 3rd mkr.
ROW 47: Sl1 wyf, k2, sl 1 to remove mkr, and return st to left needle, k2tog, remove mkr, sl1, M1L, <CHART>, M1R, sl1, remove mkr, sl1 to remove mkr, and return st to left needle, ssk, k to end, turn.
ROW 48: Sl1 wyf, k 3, p2, <CHART>, p2, k to end, turn.
ROW 49: Sl1 wyf, k2, k2tog, M1L, <CHART>, M1R, ssk, k to end, turn.
ROW 50: Sl1 wyf, k 3, PM, p1, <CHART>, p1, PM, k to end, turn.
ROW 51 – 58: Sl1 wyf, k to mkr, sm, <CHART>, sm, k to end, turn.
ROW 59 – 63: Sl1 wyf, knit to end, turn. Bind off on WS.
Chart
The chart is read bottom – up and right to left. Remember that you will purl on every stitch of the chart when working on the Wrong Side.

Finishing touches
- Weave in all ends.
- Block your square.
Joining your knit squares
You can use whatever technique you prefer to join your squares, but my favorite is to simply sew them up together.
For that I will cut a scrap piece of yarn (about 3 times the length of the seam) and will thread it through a tapestry needle.
Then I will place the squares on top of each other right-side in and will hold them together in place with some pins.

After that, just sew them together with your needle, starting by making a little knot at one corner. Since each square will be designed by different people, they won’t necessarily have the same amount of rows or stitches, so try to even them out but don’t worry about matching the rows or stitches from one square to the other. You should go through both loops of the side of my square, though.


Thank you so much for your outstanding traveling Afghan square! I have been anxiously waiting for it, and it is so special in design (and sentiment) on this cold rainy day in Pennsylvania (USA). I hope I can do it justice.
LikeLike
Love it!! Quick question…are there some sm notations missing from row 7?? I got a little lost there…
LikeLike
Ah! yes, it was missing a “sm”. Just fixed it. Sorry about that!
LikeLike
Actually, I think it was missing “knit to marker, slip marker”. Hope this helps!
LikeLike
Totes true. Someone else caught that one as well. So sorry! But THANKS for the help!
LikeLike
I am so excited to get started on this beautiful square! I was wondering if the first knit 17 on even rows 6-16 were supposed to be purls. Thank you so much for adding to this fun project.
LikeLike
Hi! So the first sts on the WS will be knit because it’s reverse stockinette. That way they will look purled on the RS. Hope this makes sense.
LikeLike
Pattern for crochet please
LikeLike
The crochet one is coming from mammadiypatterns really soon!
LikeLike
I also wondered lol
LikeLike
Me too 🙂
LikeLike
Hi Sandra! Can I ask a question? In the charted instructions, should the instruction for Row 19 – 46 be “Repeat Rows 17 and 18” instead of “Repeat Rows 15 and 16”? Thank you and I love how you translated your story into your pattern!
LikeLike
Row 6 says to knit on WS after the garter edge. Should this be purled instead?
LikeLike
No worries! xx
LikeLike
Just acquick question, when you sl1 ,p1, sl1 in the middle, do I slip it knitwise or purlwise?
LikeLike
I love the beautiful story behind this unique pattern!
I had a question about the charted instructions…when you write: “ROW 19 – 46: Repeat Rows 15 and 16.”
Do you mean to say repeat Rows 17 and 18 instead? Thanks!
-Kayla
LikeLike
Ah! YES! I’m sorry about that. Fixing it right now! THANK YOU for letting me know!
LikeLike
What is 1st one. I missed it.
LikeLike
If you read back on the post, you can find the itinerary and a link to TwoOfWand’s blog for the 1st square.
LikeLike
How do I ask a question? I need help on row 5.
LikeLike
Hi! You can email me at sandra@nomadstitches.com or simply use the contact form on my website. I’m here to help.
LikeLike
Did I miss the crochet version?
LikeLike
The second square of the crochet afghan will be released by mammadiypatterns really soon. Only the first square (both knit and crochet) was designed by one person. Not EVERY square will have a different designer for each craft.
LikeLike
The crochet square is here
https://www.mammadiy.es/2020/01/26/the-traveling-crochet-afghan-square-2/
LikeLike
Thank you Toby!
LikeLike
It would be helpful if starting on row 5 you state whether to sl1 as if to k or p as well as with yarn in the front or back. Thank you.
LikeLike
I’ve just added a note about this. They are slipped purlwise. Thanks for the suggestion!
LikeLike
Thanks so much! I spend some time trying to figure that one out!
LikeLike
I LOVE your square! I’m actually making the crochet afghan and this project has been so fun! I’m trying to be patient for each upcoming square (although that has been a challenge….) . The good news is, I’m getting a lot of progress on my other WIPs in between blocks! 2020 is teaching me patience!
LikeLike
It’s a beautiful square and a beautiful story. I am so excited to be participating in this. I am doing both – knit and crochet (yes, obsessive!) but I have a ton of yarn scraps to use and can’t think of a better way to utilize them! Thank you!
LikeLike
I see a lot of comments about some errors in the pattern, will there be updates to the pattern we can download? Or do we just try and figure this out by correcting the one we have. I don’t see the notes you were talking about.
Thanks
LikeLike
Hi Donna. I have corrected the pattern. I really dropped the ball on this one and let the excitement and lack of sleep get the better of me. I think (I really hope!) that I’ve gotten all the little errors and that you can now just follow the patter on the website. I will update the Ravelry pattern right now as well.
LikeLike
Sandra! Please don’t be discouraged! The square is beautiful, and really, if you follow the chart, and have a little experience, the pattern works out nicely! Thanks so much for sharing this pattern!
LikeLike
Thank you for the video – it is SO helpful! Especially as I knit the English way (as opposed to the continental!). At first I had my stitches twisted – the video is perfect – it helped so much! I love the square!
LikeLike
Row 50. Should it be P36 instead of P39?
I’ve redone this part twice, and I only have 36 stitches between the 2 outside 4 knit stitches border.
LikeLike
You should have 37 in between the 4 st border. It’s not 39, but it’s not 36 either. Sorry about that. It’s all corrected now.
LikeLike
Thanks, I had an error a few rows back, ripped it out and I’m back on track!
LikeLike
Row 16 “sl1 p3 sl1”? Or should it be p1-k3-p1? Or else there is a sl1 in row 15 and then sl1 on same stitch in row 16. Or may be I am making a mistake in reading it.
LikeLike
Nope, that was my bad. I really dropped the ball on this one. So sorry. It’s p to mkr on the back of the middle section.
LikeLike
A Beautiful Square and a beautiful story ~ but I have to say my level of frustration in the pattern which I had printed out is growing. I got to row 12 yesterday and was not happy with the results so I started over again today. I went online and saw there were changes.Started over and got to Row 16 and looking funky again. Went back online to read in the blog that there had been numerous errors I’m ready to start over again. Is it possible to get a copy of the most recent corrected pattern that can be printed out? I purchased the knitted kit through Lion Brand and was under the impression that the patterns were free.
Thanks much
LikeLike
Hi Debbie. I really am sorry about the mistakes in the pattern. The latest edit was done about 12 hours ago and it should have addressed all of the issues. The pattern here in the blog is correct now and it’s free for everyone. You can print it directly from here or copy and paste on to a word document and print from there. You can also buy the pdf from ravelry for $1US as a symbolic gesture of support. I hope this answers your questions
LikeLike
Hi, Thank you for the lovely pattern. I got to row 18 and got stuck on an abbreviation that I couldn’t find, “pto”. I finally figured out that a space is missing and it should read “p to”, which makes more sense. LOL!
LikeLike
Goodness! What a silly mistake from my part! And I thought i’d got them all. On it now! (also, pto is how I abbreviate stitch in Spanish, so I first thought that I had really messed up!! – I’m glad you figured it out though.)
LikeLike
I guess I missed the latest corrections because I finished my square before the latest corrections so my right edge is wonky after tow 47. Because there’s no way for me to think back and fix it, I’m leaving it as is. It will be my reminder that I am human and mistakes are inevitable (for all of us).
LikeLike
Preach it! So true. I usually leave minor mistakes in knits that are just for me. It does remind me to forgive myself and love imperfections. Still, sorry about the mistakes!
LikeLike
I’m on Row 27, is there a correction for this row? My count is off between 2nd & 3rd markers. Before I rip it again I thought I would ask. Thank you for your help and loving the square.
Bethany
LikeLike
Hi Bethany. Nope, row 27 is correct. To be honest, I find it MUCH easier to work on lace sections using charts. Maybe give it a go? Happy knitting and let me know if you have an other questions.
LikeLike
I too love your beautifully designed square. Your story about it is special. Thanks! I had some trouble too with my printed version. Got to Row 18, and there was a strange “gmkr” printed. I wasn’t happy with the way the last few rows looked anyway, so decided to check your pattern again today. Thank you for the corrections. I will check through my printout to make other corrections. Don’t worry about the mistakes. A pattern like this this is hard to write out, and most of us understand. Perhaps you could put a note at the beginning of the pattern that says the pattern on the blog now has corrections. Others might not see it down here in the comment section. Cheers!
LikeLike
Thanks for your graciousness! It’s lovely of you. I did write a little note at the top of the pattern a few days ago for this very reason. I hope it’s helpful.
LikeLike
Beautiful square!! I can’t wait to get started. 🙂 And I love the story of how you came up with your pattern. I agree, being a mom and knitting (or crocheting) go so well together! Thanks for sharing your creativity, Sandra.
LikeLike
Thank you!! And yes, I love saying “I love you” with handmade!
LikeLike
Hi Sandra, I’ve completed it! Mine, due to my knitting tension (which was very tight for some reason – it usually isn’t!) I have the pattern but it doesn’t look like lace. It is pretty though. And it has nothing to do with your pattern! I might make one small suggestion? If you could add how many knit/purl stitches there should be from end to end (on the “you” and “your husband” part of the pattern) it would help to know what row you are on. I accidentally picked up a stitch somewhere around row 37… I had to go back and then couldn’t remember which row I was on! So for instance, If you put the stitch count in parentheses, it would be helpful! As in, “k to marker (16)”, “p to marker (16)” Thanks for all your hard work – and I just love meeting knitters/crocheters from around the world!
LikeLike
Hi! Great suggestion. I’ll go back and edit it as soon as I get a chance!
LikeLike
Sandy, have you done this yet??? I just printed another copy of the pattern to be sure I have all the edits, but this suggestion appears not to have been added. It’s been over 3 weeks since your response above!
Thanks.
LikeLike
Hi Jan. You’re right. I have not done this. I totally forgot about it and since nobody else has been having issues with it, it slipped my mind completely. We’re working on remodeling my house while still having jobs and taking care of baby at the moment, but as soon as I have a break I’ll get on it. Sorry about that. Either way, it will help you to know that you will decrease 1 st on these sections on every odd row, starting with 17 sts. Thanks for your patience.
LikeLike
Perhaps if the counts were there as suggested I wouldn’t have been so overwhelmed by this little square 😦 I consider myself an intermediate knitter but this design seems to be beyond my capabilities. I have ripped it out so many times my yarn is shredding. (This yarn splits very easily, it is disappointing). I ripped it out for the last time tonight, I think I’ll put it away and go back to reading a book, apparently I’m not cut out to be a knitter, taking on this Afghan was too much
LikeLike
No! Don’t give up! Skip my square if you must, but please don’t stop. Definitely take a break, though. There’s nothing more angering than trying to work something out while frustrated. I usually find that if I step away and come back a few days later it seems like the easiest thing! Everyone can be a knitter!
LikeLike
Hi Sandra! Your square is beautiful and it has a lovely story. But, being a real novice in knitting it is quite frustrating. I’ve been going back to your video on every row ( your video is great!). I am now on row 32 and I have noticed that somewhere around 4-5 rows down I dropped a stitch and it is just hanging there. I will need to rip out these rows. However, since there are markers,when I stop ripping, I will not know where these markers belong. As I mentioned before, it is frustrating, and I am not sure what to do. It has taken me a week to get to this point, is there a way to do this square in a simpler manner?
LikeLike
Hi Nancy. Dropping stitches is THE WORST! It happens to me all the time. You should make note of how many sts you have on the row that you are frogging to, that way you will knit easily where the markers go. Remember that there’s always a total of 45 stitches and 8 of them are of the border. You can count the stitches on the chart to know how many you should have in between the middle markers and then you can figure out the sides. Also, pick up the sts where you want to restart before to rip back to that point. It will make it easier.
Another solution is to just try to fix the dropped stitch without ripping back your work. There’s a ton of video for how to do this. Good luck!
LikeLike
Hi Nancy. I think I replied to you on Instagram? I’m sorry this happened to you. Dropping stitches is the worst! I guess just try to be more careful, but I’m not sure there’s a simpler manner to complete the same pattern. Whenever I am going to frog a lot though, I usually take my needles out of the project and then weave it on the row that I want to rip back to, carefully picking up each stitch. Since each section is quite distinct and/or separated by a special stitch (like the sl sts from the middle section) I think it will be easy enough for you to figure out where the markers need to go. You can always count and figure out what row you’re in and figure out how many stitches go into each section. Hope this helps.
LikeLike
Thank you so much for a beautiful square and for your video. At first glance, the square looks complex, but your video was so helpful. I am excited to dig into working tomorrow. Thank you for helping beginners like me learn these techniques.
LikeLike
Thank you! It was my pleasure and I’m so glad you found the video helpful!
LikeLike
I’m also traveling while doing this square of “the traveling afghan”. I carefully did a copy and paste to a word processing doc and printed out the instructions before I left home.
Noticed it wasn’t working & now see the various corrections.
Can you highlight where there have been corrections, so we beginning knitters don’t have to read thru each line on 4 double spaced pages to see what matches the original and what has changed.
LikeLike
Hi! It’s a bit hard to do that because I’m not really sure I remember what I changed. There was definitely something on row 7 and 16. And I think it was row 50 that had a wrong stitch count. But other than that it was just editing typos. Sorry about the confusion and sorry about not responding sooner. I’m away on holiday with my family.
LikeLike
Can you highlight the various corrections, so I can update the copy of original instructions that I printed before I left home ? I’m traveling and don’t have access to copy and reprint.
LikeLike
Hi! It’s a bit hard to do that because I’m not really sure I remember what I changed. There was definitely something on row 7 and 16. And I think it was row 50 that had a wrong stitch count. But other than that it was just editing typos. Sorry about the confusion and sorry about not responding sooner. I’m away on holiday with my family.
LikeLike
The square is beautiful but definitely not for beginners. I knitted and had to undo it at least 20 times. It was way to hard for me. I eventually did it without the lace section.
LikeLike
Aw, I’m sorry you struggled but I hope you found the learning rewarding!
LikeLike
I very much agree! Although the outcome is lovely, this is absolutely NOT a pattern for beginning knitters. I wish I had received an email when each problem was discovered! I had no idea until TODAY that there were so MANY ERRORS! To say that we are all frustrated is an understatement. I’m usually very forgiving, since we all make mistakes; however, Sandy, you REALLY SHOULD HAVE proved your pattern before you posted it! Aaarrrggghhh!!!
LikeLike
So true. I have learned my lesson and apologized profusely many times. I also sent updates to all who bought the pdf on ravelry, added a note at the top of the pattern on the blog and let people know on Facebook and Instagram. Not sure what else I could have done to inform you of the edits. It was all solved within a couple of days of publication. Thanks for your understanding.
LikeLike
I feel like a moron…. I’m slipping the first stitch moving yarn to front and k to end and every row grows by one stitch which I don’t think is right but I can’t tell because there isn’t a note about how many stitches should be in each row. someone help please I should be able to do this….how embarrassing hahah
LikeLike
Hi Annie. I hate not being able to figure something out. There are always 45 sts, on every. So you should definitely not be increasing. Have you seen the video? It should how to do the sl1 wyf. Maybe it will clarify things
LikeLike
I have never used a chart before, so I hope this question isn’t stupid, but studying the chart it looks like the / should be ssk and the \ should be k2tog ?
LikeLike
Well, the k2tog leans right, so / is the correct symbol. Same for ssk which leans left.
LikeLike
ok on the written instructions on row 19 after you have M1L there is k2tog, YO, k1, YO, ssk the chart symbols after M1L are: \ (ssk), YO, k1 YO, / (k2tog) ? Am I reading it backwards?
LikeLike
Well, charts are usually read from right to left in odd rows and left to right on even rows. So the written instructions do match the chart, but maybe not visually. Does that make sense?
LikeLike
Yes it does thanks!
LikeLike
By row 43 I had 2 stitches left between marker 1 & 2, and 3 & 4. So after knitting the row I had 1 stitch left between the markers. Row 45 still says to knit to 2 before marker and skpo, but since I have 1 stitch I can’t. Did I mess up somewhere, or does that seem correct? If it’s correct should I just knit that stitch?
Thank you so much for your beautiful pattern! I’ve always crocheted and am new to knitting, your pattern has taught me so much, and I so relate to the story behind your square! I feel the same way about my girls!
LikeLike
Well, before row 43 you should have 3 sts in between the side markers – 2 after knitting it. Then after row 45 you will have 1 like the note says. Maybe you miscounted and you’re actually on row 45? Either way, you should be able to complete it by simply working the chart or chart instructions.
LikeLike
Hey Sandra! I figured out where I went wrong above, before you had even commented actually. I should have waited to ask about it because it was definitely me just missing an increase or something! Thank you for your reply!
I wanted to come back and encourage you though, because it seems a lot of people are saying the square is too hard and getting frustrated. I would very much consider myself a beginner! I have crocheted for a long time, and last fall/winter I decided to start learning to knit. However, I had a lot of crochet WIP’s lined up, so I only got as far as learning knit stitch, I didn’t even learn to purl. So when I started this afghan I was basically starting from scratch. Alex’s square got me feeling pretty secure in knit and purl, then I have to admit when you posted your square I was nervous at first. Previously I would have looked at something intricate like this and thought, “I could never!!!” I was excited though, I knew if I could finish this square I would have learned SO much, and my knitting skills would be far ahead of where I would have expected I could be! So, with your VERY helpful video tutorial in hand I cast on with nervous/excited confidence! I totally finished it! I started it after all of the edits were made, and was able to finish it before the 3rd square was posted.
Did I tear it out a few times? Yes. That was all me though, and not your pattern. Mostly the result of knitting way past bedtime and making sleepy mistakes. Haha! My lace doesn’t stand out quite as much as yours, but I suspect that is largely because I haven’t had time to block it yet. So, I feel like if I can do it, anyone can.
It really is so, so beautiful! I always wanted to learn to knit, but being a crochet girl for so long, I never thought I would love knitting as much as I have started to, and I give a lot of credit to you and your square for my newfound knitting passion! I am so proud of my finished little lacy square! So thank you! So much! You made a beautiful square, it’s my favorite of the 4 so far, and I suspect it will stay one of favorites. Partly because of how much it taught me!
LikeLike
Hi, I am struggling here on row 15 and 17. when I sl then M1l theres not a knitted stitch to pull up because the sl1 isn’t knitted. Row 17 is the same. After i do row 19 i have huge holes because of YO. I have taken these rows out about 5 times now. Can you be little more detailed on 15, 17, 19 please. Thank you JoAnn
LikeLike
Hi JoAnn. Have you watched the video? It tells you exactly how to do the M1L and YO and I actually go over those exact rows. Please watch it to clarify all of your doubts. You can find it here on this post or on YouTube.
LikeLike
Hola Sandra!
Felicitaciones por tu preciosa familia y por un bloque tan especial. Al principio tuve algunas dudas, pero la verdad que ha sido un placer inmenso. Algunas cosas las sabia, como los M1 y ssk. Pero la verdad que me llevo de esta experiencia con tu hermoso trabajo una enseñanza que me queda para siempre. Habia algunas puntadas que ni conocía y me quede sumamente encantada al terminar, de lo lindo que quedo y de lo que aprendí en un bloque. Te estoy sumamente agradecida, porque creo que aprender algo nuevo siempre es enriquecedor. Mi hija se reía porque al principio yo estaba “pero que es este punto” y al final, lo logre y creo que tu esfuerzo en hacer algo único, mas allá de lo convencional, demuestra que con ganas se puede. Asique mil gracias, por lo que yo llamo el árbol de la vida. Me transmite eso. Ha sido un gusto poder conocer tu trabajo. Un cariño grande desde Buenos Aires y a disfrutar de la familia y las lanas.
LikeLike
😭😭 eres un amor! Gracias por tu mensaje que me haz hecho el día! 🥰😍Y que gozo que hayas aprendido algo y visto algo nuevo como la oportunidad perfecta para aprender! 😘😘
LikeLike
Hello Sandra –
Your pattern is a beauty and I love the symbolism of your family! With that said, I’m still attempting to master the new lace stitches that are new to me. Your video is very helpful, however, I have a question on row 5 with your comment in parentheses. Which two stitches????( I am reading sl1, p1, sl1 which equals a total of 3 stitches.) I’m confused.
Your instructions read:
Sl1 wyf, k3, PM, k17, PM, sl1, p1, sl1 (these 2 sts will be slipped purlwise with yarn in the back from here on), PM, k17, PM, k4, turn.
(I may have just figured it out: Your telling me that any sl1 stitches OR any p1 stitches from now on are slipped purlwise.) Is this correct??
Also, I’ve ripped out the lace portion….again and watched the video several times as well as taken notes. My ML1 stitches leans to the right correctly, however, my MR1 stitches look more like a thorn bush 🙂 and maybe a few hovering aphids nibbling holes in it too. My bad, not yours!
Tenacity is my middle name and I’m loving the challenge! I see where several knitters have created their squares so that fact is very encouraging! Thanks for your clarification! Paula
LikeLike
I’m glad you like the square! Now, let’s see.
Purl stitches are not really slipped, they are purled. So the 2 sts that I am taking about when I say that they will be slipped purlwise are the 2 slip stitches on that section. Those 2 slip stitches will be slipped purlwise on every even row. Sorry for not being clear, I thought it was obvious but I can see how it can be confusing.
So remember that not ALL slip stitches will be slipped purlwise. Some like in ssk or skpo are slipped knitwise like the instructions say.
And I hope you figure out the m1r. I learned it from a purlsoho tutorial with drawings. Maybe it will be more helpful to you than my video.
Happy knitting!
LikeLike
Success!!! I put my square on the back burner and let the pattern “simmer” a few days. With some thinking, practicing the stitches, watching your video and some others, I FINALLY had a clear understanding of the stitches. My second square attempt looks so much better. Most of all, I know I’m becoming a better knitter.
With every travel trip, there are a few bumps in the road, some turbulence, a detour or two – that’s what makes it an adventure. Everyone, keep your seat belts tightly secured- just hang in there and enjoy the scenery of these faraway destinations. I wasn’t even sure where Bulgaria was until now! Thanks, Sandra.
We are creating some beautiful afghans, my friends!
LikeLike
Yes yes yes! This is what it’s all about! Thank you for your message and for not giving up! 😘😘
LikeLike
Thank you for Square 2. I was lucky in that I chose to make the crocheted square first, so all the corrections to the pattern were done when I started the knit square. I had no problems aside from one tiny error that won’t show after assembly (I knitted the first stitch instead of slipping on one row). I’ve enjoyed reading each designer’s story of the symbolism worked into the patterns. My square is on the blocking board, ready for assembly.
LikeLike
I’m so glad you enjoyed it! 🥰
LikeLike
Sandra, please do not be discouraged in any way! I am an intermediate knitter, and although challenging, if you follow the chart, (use post its to separate lines), and keep up with the count, the square works up beautifully! I did not tear out once, did not need to see updated, obvious corrections, and am very pleased with the lace part! Actually, the third square is very annoying because it’s so simple! Cables should have been in the square from Ireland! Thanks for this beautiful, intricate square!
LikeLike
Ah! You’re a sweetheart! Thank you so much!
LikeLike
Sandra, please do not be discouraged in any way! I am an intermediate knitter, and although challenging, if you follow the chart, (use post its to separate lines), and keep up with the count, the square works up beautifully! I did not tear out once, did not need to see updated, obvious corrections, and am very pleased with the lace part! Actually, the third square is very annoying because it’s so simple! Cables should have been in the square from Ireland! Thanks for this beautiful, intricate square!
LikeLike
Hi Susan. Yes, both patterns are updated. Have you tried using the chart? I find it much easier than written instructions. Also, you should always decreases at both sides on all the right side rows, so there’s no reason why it shouldn’t be centered. I hope you can figure it out. Let me know if I can help
LikeLike
I have to say this is the hardest thing I have ever tried to knit. I am not an expert knitter but I have never quit any project and I quit this. After taking it apart 10 + times. I think a more simple pattern with a yarn that does not split would have been much better. I am putting it aside and going to number 3. I hope it is more interesting and not as difficult. I will return to # 2 when I complete all others. This is the only time I have ever been so frustrated that I felt the need to vent.
LikeLike
Oh! I’m really sorry to hear that! Are you sure you have the latest version of the pattern? The one on ravelry and here on the blog has no mistakes. And are you using the video to help you out? It goes over all of the stitches. Although sometimes you just need to put a project aside. You’ll see that next time you try it will all make sense. Please feel free to contact me with any questions! I’m here to help. 😘
LikeLike
It would have been great to have a video tutorial demonstrating the English version of knitting. The video totally confuses and english knitter like me.
LikeLike
I’m very sorry you didn’t find the video helpful. I know how to knit both styles, but my English style is NOT pretty. Believe me, I tried! There are however tons of videos on Youtube demonstrating each of the stitches. I hope you found one that helped.
LikeLike